The next fireplace were installed in Malibu California. The master bedroom was on the third floor. We did a little paparazzi photo shoot while we were there. The glass we installed was 1/4" Starfire Base Glass.
The fireplace below belongs to Robert and Rena in Palm Desert California. They choose a warm brown high heat paint too match their furniture. Originally we installed two metal shields to cover and hide the nasty looking side vents. On many fireplaces to keep it minimal we do just the side covers which actually looks fine and finished.
Here is the just finished surround. And here is the surround installed. Looks great!
We made 3" sides and top with a 6" bottom with 2" of frosted glass installed on the interior. See More on the Fireplace Surrounds Page!
The surround below was installed in Riverside California By Ruben. Ruben made a template to fit his fireplace. A bit over the top but Ruben is good for that! By making a preview template you can get a preview of what it will actually look like before we manufacture it for your fireplace. We will explain as we move on. The wood and card board template. The blue tape will be frosted glass. On the back side you can see the cover fins Ruben wanted to have installed. This was to cover what he did not want to see in the fireplace after the surround was installed. In our designs we ask what do you want to see and what don't you want to see.
And below you can see the surround front finished.
Above and below you can see the back side with the fins attached for installation. We will post pictures as soon as Ruben sends them to us.
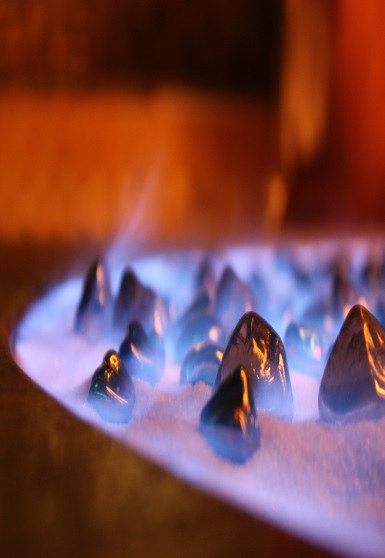
The fireplace below is in Palm Springs California. We used Starfire Base Glass over a 2" bed of sand. We will narrate as we go. Here is the fireplace with the screen removed.
Now we remove the doors, very simple. One screw on each side at the top generally removes the doors. Below, remove the end of the flex line and screw it on to the stub out coming out of the wall.
Below, now attach the flex line from the burner to the stub out. Keeping the flex line curled under the burner. Below, pour in as much sand (on lighter colors) as you would like to raise the glass bed.
Look how easy! Even my installers can do it! Bring the burner to the top of the sand so it can operate properly. With crushed lava you can keep the burner below the surface. Keep your sand/ lava at least 3" to 4" away from the front! Pour the glass and you're done! Our typical install where we don't have to paint is about 12 minutes!
Looks awesome!

The fireplaces below are located in Palm Desert California. These were both filler with crushed lava (3" to 4" each) and then topped with a Bronze Base Glass. We then added 6" gray FireBalls. We will explain as we proceed. This was the outdoor fireplace. 38" "H" burner was installed.
We then poured in about 4" of crushed lava filler. Then we poured in about 1 1/2" of Bronze Base Glass.
Then we stacked in the 6" FireBalls. We couldn't get any burning pictures because it was to bright outdoors. The fireplace below was indoors in the family room. We started with about 3" to 4" crushed lava filler We used a 38" "H" burner again in this fireplace as well. Then we tested the flame pattern to insure the flames were not hitting the walls.
Then we added the 6" Gray FireBalls to the top of the Bronze Base Glass.
One very nice family room!
The next fireplaces were installed in Malibu California. The family room was on the entry level (second floor) and the roof top deck was located on the 4th floor. We did a little paparazzi photo shoot while we were there. The glass we installed was 1/2" Bronze Base Glass over a bed of crushed lava.

The metal border is installed holding the outer layer of rock in place.
They didn't like the post in the fireplace so we cut a mirror to preview if in fact they wanted it covered at all. If they would of wanted it covered we would of made piece of super 8 stainless steel (highly polished) to cover the post. The mirror was only a temporary visual. DON'T USE REGULAR GLASS NEAR ANY FIRE! So if you are not sure, preview it. The glass we used was a Bronze Base Glass with Gold Base Glass and Clear Diamonds.

The fireplace below is typical wood burning fireplace which we see every day. Once uncovered it looks like an incinerator. They are pretty nasty looking with out the fire burning. We like to show the before and after so you know what you really have.
We had Starfire Base Glass installed with Ice Ice Ice Topper on top. Nice! Very Nice!
 |
 |

The fireplace below has
Starfire Base Glass with,
Orange Topper,
Garnet Topper,
Ice Ice Ice Topper,
Cobalt Blue opper,
Copper Blue Topper and
Steel Blue Topper. The
Orange is actually one of our chameleons, it turns to bright red when it gets hot and then changes back! Our
Copper Blue Topper is a chameleon as well. It turns to green and changes back to blue when cooled!
This next fireplace was done with lack of knowledge! First they installed a 18" single burner and some real interesting choices of glass. What they did do correct is have a 3" sand bed under their yuk glass. The first issue we repaired was the stub out on the left side of the fireplace floor. All we did was install a 90 degree elbow and connect a 1/2" flex line to the new double 24" burner. They had left the flex pointing in the air and then reduced it to a 3/8" line and to top that off added they very sad single 18" burner. We repainted their futile attempt (of painting) with dark metallic brown, added 10 lbs of sand and poured 75 lbs of Starfire Base Glass over the new burner and sand filler. We will explain as we move forward.
 |
 |
Below you can see the black marks under the paint. Below you can see the flex line that was installed was left above the surface. Now if we tried that I think our customers would take us out and string us up, what do you think? To top it off this customer was an attorney! Completely happy with what we did.
Here is the new paint on the back walls. Now we added the Starfire Base Glass. One thing we have been doing a little bit different is to bring the glass out from the front of the fireplace. We let the glass come out of the fireplace from 3 to 6 inches to make it look even more grand. What do you think?
Here is a the almost finished product of what we do! We left several colors with the customer to add. We will post pictures when they arrive.

The pan below was created by John Webber of San Diego. He made a cardboard mock up of what he wanted in his fireplace and we duplicated it in stainless steel. Here is John's fireplace now, our pan and we will posts pictures of the finished fireplace with our pan when John sends them to us. The glass that was installed in this pictures of the pan is Pink Rosa Base Glass.